

How To Print A Booklet In Word 2010

How-To create booklets using Microsoft Office Word 2010 and brand piece of cake to print booklets from word documents.
Whether you are working on a schoolhouse projection or creating advert materials, a decent booklet can come in handy and inspire the wow factor. Using Microsoft Word 2010, you can create professional-looking booklets and print them out yourself (assuming you lot accept a decent printer). With merely a few simple clicks. It's that simple.
Note: If you are using a new version of Give-and-take check out one of the following articles:
How to Create and Print Booklets using Give-and-take 2013
How to Create and Impress Booklets using Give-and-take 2016
Honestly, the but existent work is coming up with the content, every bit Word will automatically impress each page in the right order with proper placement on the newspaper. Earlier you get booklet fever and keep a artistic spree, first, we need to fix up the page layout. Using booklet mode, Give-and-take 2010 will essentially shrink each page like it'south folded in half. We'll talk more about the layout in step 3 below. Permit's get started!
How-To Create Booklets Using Microsoft Word 2010
1. Click File, then Impress, and at the lesser of the list, click Folio Setup.

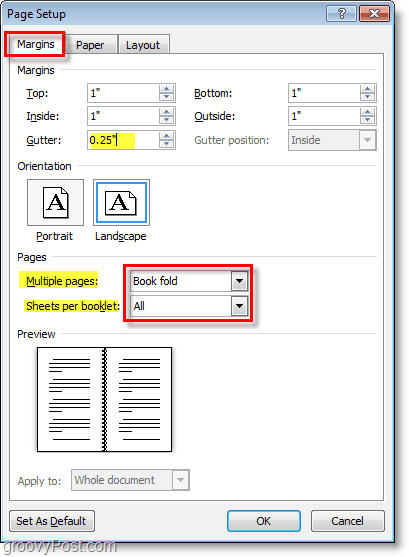
ii. In the Page Setup window, click the Margins tab. Then under Multiple pages, select Book fold from the drop menu. Under Sheets, either select All or the exact amount of pages you plan on having. Be sure to set the gutter to a small margin. The gutter determines the space between your page content and the fold in the centre of the paper where you lot typically bind pages together.
3. Create your booklet content, but go along in mind that content will print differently than a regular document. Page 1 and 4 will be printed on the same side, as Page 2 and 3 will exist on the reverse side. Each page size shrinks to the scale of half a regular page in mural mode. The image below should help illustrate.

4. When you are ready to print, click File so Impress, and change the press preference to the correct setting for your printer. For example, if your printer can automatically re-feed printed documents, use i of the Print on Both Sides settings. If your printer requires you to manually re-insert your paper, select Manually Impress on Both Sides.

Now you can continue adding pages and design your booklet to be equally large equally y'all like. Don't forget that the larger you brand your booklet, the larger y'all'll need to make the Gutter, so page content doesn't become lost in the cracks when you demark them together.

Questions, Comments? Drop one below or join the discussion in our costless forums.
![]()

How To Print A Booklet In Word 2010,
Source: https://www.groovypost.com/howto/howto/create-booklets-using-microsoft-office-word-2010/
Posted by: jacksonandounized91.blogspot.com
0 Response to "How To Print A Booklet In Word 2010"
Post a Comment